


| Programmer to ProgrammerTM | |||||
| |
|||||
|
| |
||||
|
|
|
|
|
|
|
|
|
|
| |||||||||||||||||||
| The ASPToday
Article July 12, 2002 |
Previous
article - July 11, 2002 |
||||||||||||||||||||||||||||||
| |||||||||||||||||||||||||||||||
| ABSTRACT |
| ||||||||||||||||||||||||||||||
|
| |||||||||||||||||||||||||||||||
| Article Discussion | Rate this article | Related Links | Index Entries | ||||||||
| ARTICLE | |||||||||||
When developing clients' websites we often need to transfer data back-and-forth between development, staging and production databases, which are often hosted in separate physical environments, and we use SQL Server's bcp (bulk copy program) utility to do this. bcp is essentially a command line utility that can be used to export and import data between databases. We will discuss the parameters we use when calling bcp in more detail soon. It utilizes script files that up until now, we've had to go ahead and manually write time and again. This can become quite a nuisance, but I've written an application in ASP.NET that generates the necessary scripts on the fly.
The functionality for the application can be summed up as follows:
The utility itself, I've called it BCPExpress, is a fairly simple one, but uses various aspects of the .NET framework which I will be covering in varying degrees of detail. These include:
Here is an example of a bcp command:
c:\mssql\binn\bcp "pubs..authors" out "authors.bcp" -n -S "hughespc" -U "sa" -P ""
So the format that we will be using here is:
bcp "database_name.owner.table_name" in|out "data_file" -n [-q] [-E] -S "server_name" -U "login_id" -P "password"
This is by no means a comprehensive list of bcp options - search on bcp in SQL Server Books Online for a comprehensive listing of parameters. The command-line parameters that we will be using in this article are:
Now, on with the application:

The default.aspx page is used to retrieve all the information necessary to generate the scripts. The parameters required are as follows:
| Transfer | Describes the migration from SQL Server to SQL Server. Based on this value, flags will be set on the bcp command line. (More details to follow.) |
| Source Server | The server on which the data resides that we wish to export. |
| Source Database | The database on which the data resides that we wish to export. |
| Source Username | The User Id that we will use to connect to the SQL Server on which the data resides that we wish to export. |
| Source Password | The password that we will use to connect to the SQL Server on which the data resides that we wish to export. |
| Source Path to BCP | The path to the bcp executable (bcp.exe) on the source machine. |
| Target Server | The server on which we wish to import the data. |
| Target Database | The database on which we wish to import the data. |
| Target Username | The User Id that we will use to connect to the SQL Server on which we wish to import the data. |
| Target Password | The password that we will use to connect to the SQL Server on which we wish to import the data. |
| Target Path to BCP | The path to the bcp executable (bcp.exe) on the target machine. |
In addition to these fields, I have also made use of validation controls. ASP.NET's validation controls provide an easy way in which to validate data on a form. Before ASP.NET, if you wanted to perform validation you could go one of two routes:
ASP.NET makes life a lot easier for us. All we need to do is drop a validator control onto the page, bind it to a control and there you go - you are done. ASP.NET performs all the validation behind the scenes for us. There are five types of validation controls, they are:
| RequiredFieldValidator | Makes sure that the field cannot be left blank. |
| CompareValidator | Compares the value of a field to another field or a constant value using the standard comparison operators. This control is useful when comparing a password with a confirm password field. |
| RangeValidator | As the name implies, this control validates a field's value within a given range. The range could be between two numbers, two letters of the alphabet, or even two dates |
| RegularExpressionValidator | Validates the field's value against a pattern defined by a regular expression. This is useful when checking an email address, for example. |
| CustomValidator | With this control, you write the validation logic yourself. For example, you could validate a field's value based on a figure that you retrieve from a database that changes frequently. |
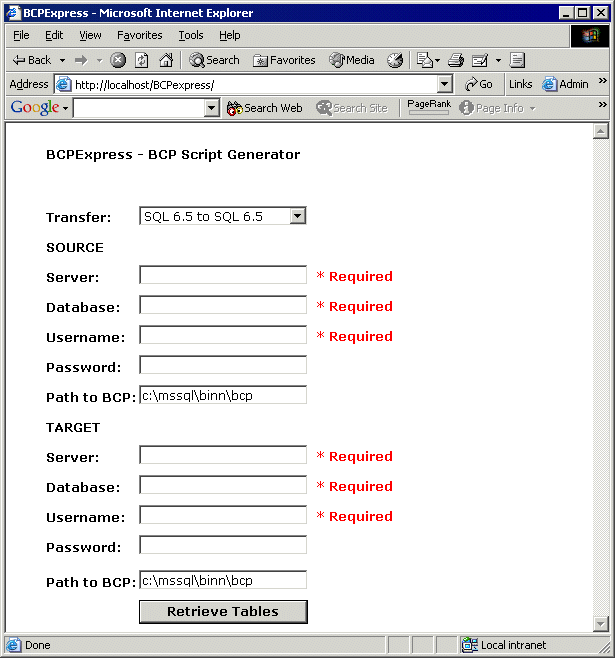
On default.aspx, I have only made use of the RequiredFieldValidator control. I have validated against all the fields except for the dropdown-list and the password fields as the dropdown-list will always have a value, and some people (like me), leave their SQL Administrator password blank (on my home machine only! Never in a production environment.)
Here is a screenshot where you can see validation in action:
Now let's look at some code. When clicking on the Retrieve Tables button, assuming we pass the validation of the form, the following happens:
DataAccess da = new DataAccess(txtSourceServer.Text,
                txtSourceDatabase.Text,
                txtSourceUsername.Text,
                txtSourcePassword.Text);
try
        {
        da.Conn.Open();
        if (da.Conn.State == ConnectionState.Open)
        {
            da.Conn.Close();

            String url = "ChooseTables.aspx?";
            url += "Transfer=" + Server.UrlEncode(ddlTransfer.SelectedItem.Value);
            url += "&SourceServer=" + Server.UrlEncode(txtSourceServer.Text);
            url += "&SourceDatabase=" + Server.UrlEncode(txtSourceDatabase.Text);
            url += "&SourceUsername=" + Server.UrlEncode(txtSourceUsername.Text);
            url += "&SourcePassword=" + Server.UrlEncode(txtSourcePassword.Text);
            url += "&SourceBCPPath=" + Server.UrlEncode(txtSourceBCPPath.Text);
            url += "&TargetServer=" + Server.UrlEncode(txtTargetServer.Text);
            url += "&TargetDatabase=" + Server.UrlEncode(txtTargetDatabase.Text);
            url += "&TargetUsername=" + Server.UrlEncode(txtTargetUsername.Text);
            url += "&TargetPassword=" + Server.UrlEncode(txtTargetPassword.Text);
            url += "&TargetBCPPath=" + Server.UrlEncode(txtTargetBCPPath.Text);

            Response.Redirect(url,true);
        }
        else
        {
            lblError.Text = "Error: The connection could not be opened.";
        }
    }
    catch (SqlException sqlEx)
    {
        lblError.Text = "Error: " + sqlEx.Message;
        lblError.Visible = true;
    }
    finally
    {
    }
First, I create a new instance of DataAccess (this is the data access layer I am going to cover as I mentioned in the introduction - more about this soon). I then try to open a connection to the database to confirm that it actually exists - if this succeeds then I close the database and pass all the fields to the ChooseTables.aspx page. If it fails, then I display an appropriate error message.
Before we look into the ChooseTables.aspx page, let's examine the DataAccess class that I've only mentioned briefly up until now.
This is an overly simplified version of a data access layer, and in most cases this class would be a base class from which you would derive your own data access layer. This was included to give you an idea of how you could potentially structure your solutions. It contains the following:
Here's the code with comments in between:
using System;
using System.Data;
using System.Data.SqlClient;
using System.Text;
These should be familiar to you, except for, perhaps, System.Text. I have referenced this namespace in order to use the StringBuilder class. (I could have used a normal string, but wanted to showcase this useful class.)
namespace BCPExpress
{
    public class DataAccess
    {
        private SqlConnection conn;

        public DataAccess(string pServer, string pDatabase, string pUsername, string pPassword)
        {
            StringBuilder connString = new StringBuilder(100);
StringBuilder isn't as powerful as String in the number of methods it supports, but it can be much more efficient than using a String in some cases. A good example is as follows: if you have a String, and you perform a replace on it, every time a replace occurs, a new string is created and the old one moves to the heap and waits for garbage collection to occur. With StringBuilder, you generally allocate more memory than your variable will need. Now if we performed the same replace as mentioned above, all the modifications occur within the same block of memory which makes it more efficient! Should you use up all the memory allocated to the StringBuilder variable, more will be allocated automatically.
            connString.Append("Data Source=" + pServer + ";");
            connString.Append("Initial Catalog=" + pDatabase + ";");
            connString.Append("User Id=" + pUsername + ";");
            connString.Append("Password=" + pPassword + ";");
            SqlConnection connection = new SqlConnection(connString.ToString());
The Append method is used to add text to our StringBuilder variable. The ToString method must be called to convert the StringBuilder variable into a string.
            conn = connection;
        }

        public SqlConnection Conn
        {
            get
            {
                return conn;
            }
        }

        public SqlCommand BuildStoredProcedure(string procedureName)
        {
            SqlCommand command = this.Conn.CreateCommand();
            command.CommandText = procedureName;
            command.CommandType = CommandType.StoredProcedure;
            return command;
        }
BuildStoredProcedure is a helper function that returns a SQLCommand object that has been configured to be interpreted as a stored procedure.
        public SqlCommand BuildQuery(string queryString)
        {
            SqlCommand command = this.Conn.CreateCommand();
            command.CommandText = queryString;
            command.CommandType = CommandType.Text;
            return command;
        }
BuildQuery is a helper function that returns a SQLCommand object that has been configured to be interpreted as a query.
        public int ExecuteNonQuery(SqlCommand comm)
        {
            int affectedRows = comm.ExecuteNonQuery();
            return affectedRows;
        }
ExecuteNonQuery is a helper function that returns an integer value that contains the number of rows affected by the query.
        public DataSet ExecuteQuery(SqlCommand comm, string pTableName)
        {
            SqlDataAdapter adapter = new SqlDataAdapter(comm);
            DataSet ds = new DataSet();
            adapter.Fill(ds, pTableName);
            return ds;
        }
    }
}
ExecuteQuery is a helper function that returns a DataSet that contains a DataTable populated with the results of the query. It accepts two parameters:
This class can be extended and reused in other solutions that you might work on in the future. Now, let's get back to the application.

The ChooseTables.aspx page lets the user select the tables that he / she wants to generate the bcp script commands for. The user moves the tables between the Unselected Tables and Selected Tables listboxes with the <<, <, >, >> buttons. The user also chooses the output format, which can be either of the following:
On this page and the next I make use of cookies to store the form fields' values instead of passing them along in the QueryString again. Of course, if this was a full-blown real-world solution, there would be more consistency in my application! I thought it would be interesting to show you various methods of passing the data between pages. Let's walk through the code:
private string transfer;
private string sourceServer;
private string sourceDatabase;
private string sourceUsername;
private string sourcePassword;
private string sourceBCPPath;
private string targetServer;
private string targetDatabase;
private string targetUsername;
private string targetPassword;
private string targetBCPPath;
These variables, which are used to store the form fields' values, have been created as private variables, which are accessible from anywhere on the page. This will come in useful if we want to access the values from a variety of methods on our page.
private void Page_Load(object sender, System.EventArgs e)
{
    if (!Page.IsPostBack)
    {
        transfer = Request.QueryString["Transfer"];
        HttpCookie transferCookie = new HttpCookie("Transfer", transfer);
        Response.Cookies.Add(transferCookie);

        sourceServer = Request.QueryString["SourceServer"];
        HttpCookie sourceServerCookie = new HttpCookie("SourceServer", sourceServer);
        Response.Cookies.Add(sourceServerCookie);

        sourceDatabase = Request.QueryString["SourceDatabase"];
        HttpCookie sourceDatabaseCookie = new HttpCookie("SourceDatabase", sourceDatabase);
        Response.Cookies.Add(sourceDatabaseCookie);

        sourceUsername = Request.QueryString["SourceUsername"];
        HttpCookie sourceUsernameCookie = new HttpCookie("SourceUsername", sourceUsername);
        Response.Cookies.Add(sourceUsernameCookie);

        sourcePassword = Request.QueryString["SourcePassword"];
        HttpCookie sourcePasswordCookie = new HttpCookie("SourcePassword", sourcePassword);
        Response.Cookies.Add(sourcePasswordCookie);

        sourceBCPPath = Request.QueryString["SourceBCPPath"];
        HttpCookie sourceBCPPathCookie = new HttpCookie("SourceBCPPath", sourceBCPPath);
        Response.Cookies.Add(sourceBCPPathCookie);

        targetServer = Request.QueryString["TargetServer"];
        HttpCookie targetServerCookie = new HttpCookie("TargetServer", targetServer);
        Response.Cookies.Add(targetServerCookie);

        targetDatabase = Request.QueryString["TargetDatabase"];
        HttpCookie targetDatabaseCookie = new HttpCookie("TargetDatabase", targetDatabase);
        Response.Cookies.Add(targetDatabaseCookie);

        targetUsername = Request.QueryString["TargetUsername"];
        HttpCookie targetUsernameCookie = new HttpCookie("TargetUsername", targetUsername);
        Response.Cookies.Add(targetUsernameCookie);

        targetPassword = Request.QueryString["TargetPassword"];
        HttpCookie targetPasswordCookie = new HttpCookie("TargetPassword", targetPassword);
        Response.Cookies.Add(targetPasswordCookie);

        targetBCPPath = Request.QueryString["TargetBCPPath"];
        HttpCookie targetBCPPathCookie = new HttpCookie("TargetBCPPath", targetBCPPath);
        Response.Cookies.Add(targetBCPPathCookie);

        PopulateSourceTableList();
}
In the load event of the page, if we are not posting back to ourselves, we retrieve the form fields' values from the QueryString and assign them to the private variables we defined above, and then create an instance of the HttpCookie class for each of the values, and finally add the cookie to the cookie collection.
Next we call the PopulateSourceTableList method to retrieve the list of tables in our database:
private void PopulateSourceTableList()
{
    DataAccess da = new DataAccess(sourceServer, sourceDatabase, sourceUsername, sourcePassword);
    try
    {
        da.Conn.Open();
        SqlCommand cmd = da.BuildQuery("sp_tables null, null, null, \"'TABLE'\"");
        SqlDataReader dr = cmd.ExecuteReader();
        while (dr.Read())
        {
            if (dr["TABLE_NAME"].ToString() != "dtproperties")
                lstUnselectedTables.Items.Add(dr["TABLE_NAME"].ToString());
        }
    }
    catch (SqlException sqlEx)
    {
        lblError.Text = sqlEx.Message;
    }
    finally
    {
        da.Conn.Close();
    }
}
We create an instance of our DataAccess class, open the connection and then execute the following command to retrieve the tables in our database:
sp_tables null, null, null, "'TABLE'"
The sp_tables stored procedure returns a list of objects that can be queried in the database - basically any object that can appear in a FROM clause. It uses the following parameters:
Looping through the DataReader, we add the tables to the Unselected Tables listbox, excluding the dtproperties table, which stores database diagram information.
Transferring the tables (that we want to retrieve the data from) between the two listboxes is done as follows:
private void btnSelectAll_Click(object sender, System.EventArgs e)
{
    for (int i = 0; i < lstUnselectedTables.Items.Count; i++)
    {
        lstSelectedTables.Items.Add(lstUnselectedTables.Items[i]);
    }
    lstUnselectedTables.Items.Clear();
}

private void btnUnselectAll_Click(object sender, System.EventArgs e)
{
    for (int i = 0; i < lstSelectedTables.Items.Count; i++)
    {
        lstUnselectedTables.Items.Add(lstSelectedTables.Items[i]);
    }
    lstSelectedTables.Items.Clear();
}
The Select All and Unselect All methods are very similar. Using a for loop, we loop through one listbox and add each of the items we find to the other listbox and finally clear the first listbox.
private void btnSelect_Click(object sender, System.EventArgs e)
{
    for (int i = 0; i < lstUnselectedTables.Items.Count; i++)
    {
        if (lstUnselectedTables.Items[i].Selected == true)
        {
            lstSelectedTables.Items.Add(lstUnselectedTables.Items[i]);
        }
    }

    for (int i = lstUnselectedTables.Items.Count - 1; i > -1; i--)
    {
        if (lstUnselectedTables.Items[i].Selected == true)
        {
            lstUnselectedTables.Items.Remove(lstUnselectedTables.Items[i]);
        }
    }
}

private void btnUnselect_Click(object sender, System.EventArgs e)
{
    for (int i = 0; i < lstSelectedTables.Items.Count; i++)
    {
        if (lstSelectedTables.Items[i].Selected == true)
        {
            lstUnselectedTables.Items.Add(lstSelectedTables.Items[i]);
        }
    }

    for (int i = lstSelectedTables.Items.Count - 1; i > -1; i--)
    {
        if (lstSelectedTables.Items[i].Selected == true)
        {
            lstSelectedTables.Items.Remove(lstSelectedTables.Items[i]);
        }
    }
}
The Select and Unselect methods are also very similar. First we loop through all the items in the first listbox, and if the item is selected, we add it to the second listbox. Then we loop through all the items in the first listbox from the last item to the first item, removing those that are selected. We need to do it this way otherwise we would end up deleting the wrong items!
For example, in listbox1 we have 5 tables: table1, table2, table3, table4 and table5. Their indexes are 0, 1, 2, 3 and 4 respectively. If we used the following for loop we would run into problems:
for (int i = 0; i < listbox1.Items.Count; i++)
{
    listbox1.Items.Remove(listbox1.Items[i]);
}
This loop will remove table1, table3 and table5 then i will be equal to 3 and listbox1.Items.Count equal to 2. By changing the for loop to start at the highest index at work to the lowest, we can avoid this problem.
for (int i = listbox1.Items.Count; i > -1; i--)
{
    listbox1.Items.Remove(listbox1.Items[i]);
}
Now on with the code. We finish off ChooseTables.aspx with the Generate Scripts method:
private void btnGenerate_Click(object sender, System.EventArgs e)
{
    string queryString = "?Output=" + rblOutput.SelectedItem.Value;
    for (int i = 0; i < lstSelectedTables.Items.Count; i++)
    {
        queryString += "&table=" + Server.UrlEncode(lstSelectedTables.Items[i].Text);
    }
    Response.Redirect("GenerateScripts.aspx" + queryString);
}
Here we build a queryString that contains basically two pieces of information:
We then pass this queryString on to the last page of our application, GenerateScripts.aspx.


This page generates our bcp scripts and outputs them to textboxes or stores them in files that can be downloaded and executed. Here we will see how to programmatically create controls at runtime based on the user's selection. To prepare the page, we place a PlaceHolder control on it. A PlaceHolder control is a container control that is used to store dynamically added server controls as we will soon see.
Let's dive into the code starting with the Page_Load method:
private void Page_Load(object sender, System.EventArgs e)
{
    Label lTitle = new Label();
    lTitle.Font.Bold = true;
    lTitle.Font.Name = "Verdana";
    lTitle.Font.Size = FontUnit.Point(10);
    lTitle.Text = "BCPExpress - BCP Script Generator";
    PlaceHolder1.Controls.Add(lTitle);

    PlaceHolder1.Controls.Add(new LiteralControl("<br>"));
I decided to build the entire page programmatically, so the first thing we need to do is to add a title. This is achieved by using a Label control which we create and configure and then add to the PlaceHolder control. Then I add an HTML break tag using a LiteralControl. LiteralControls represent HTML elements, text, and any other strings in an ASP.NET page that do not require processing on the server.
RetrieveCookies();
The RetrieveCookies() method retrieves the values of all the cookies set on the ChooseTables.aspx page and stores them in private variables declared on the page.
    if (Request.QueryString["Output"].ToString() == "File")
    {
        WriteToFiles();
    }
    else if (Request.QueryString["Output"].ToString() == "Script")
    {
        PopulateTextBoxes();
    }
    else
    {
        Label lError = new Label();
        lError.Font.Bold = true;
        lError.Font.Name = "Verdana";
        lError.Font.Size = FontUnit.Point(10);
        lError.ForeColor = Color.Red;
        lError.Text = "No output method was specified";
        PlaceHolder1.Controls.Add(lError);

        PlaceHolder1.Controls.Add(new LiteralControl("<br>"));
    }
We then retrieve the output method selected by the user and call the appropriate method (which we will cover shortly). If no output method was passed to the page, we write out a suitable error message.
    PlaceHolder1.Controls.Add(new LiteralControl("<br>"));

    HyperLink hNewScript = new HyperLink();
    hNewScript.Font.Bold = true;
    hNewScript.Font.Name = "Verdana";
    hNewScript.Font.Size = FontUnit.Point(10);
    hNewScript.Text = "Generate New Scripts";
    hNewScript.NavigateUrl = "default.aspx";
    PlaceHolder1.Controls.Add(hNewScript);
}
Lastly, we write out a link that will take us back to the default.aspx page.
Both the PopulateTextBoxes() and WriteToFiles() methods call two methods that generate the scripts. These methods are called GenerateExportScripts() and GenerateImportScripts(). We will look at these methods first:
private string GenerateExportScripts()
{
    NameValueCollection collection = Request.QueryString;
    string[] tables = collection.GetValues("table");

    StringBuilder output = new StringBuilder(100);
    foreach(string table in tables)
    {
        output.Append(sourceBCPPath + " \"" + sourceDatabase + ".." +
table + "\" out \"" + table + ".bcp\" -n -S\"" +
sourceServer + "\" -U\"" + sourceUsername + "\" -P\"" +
sourcePassword + "\"\n");
        output.Append("pause\n");
    }
    return output.ToString();
}

private string GenerateImportScripts()
{
    string importOptions;

    switch(transfer)
    {
        case "6to6":
        case "7to7":
        case "8to8":
            importOptions = "-q -n -E";
            break;
        case "6to7":
        case "6to8":
        case "7to6":
            importOptions = "-q -6 -n -E";
            break;
        default:
            importOptions = "-q -n -E";
            break;
    }

    NameValueCollection collection = Request.QueryString;
    string[] tables = collection.GetValues("table");

    StringBuilder output = new StringBuilder(100);
    foreach(string table in tables)
    {

        output.Append(targetBCPPath + " \"" + targetDatabase + ".." +
table + "\" in \"" + table + ".bcp\" " + importOptions + "
-S\"" + targetServer + "\" -U\"" + targetUsername + "\" -
P\"" + targetPassword + "\"\r");
        output.Append("pause\r");
    }
    return output.ToString();
}
Remember, for more information about the command line options of bcp, read the entry in SQL Books Online, you can also follow the link at the end of the article. These functions are very similar to one another, and pretty straightforward, so I will only explain the following two lines of code:
NameValueCollection collection = Request.QueryString;
string[] tables = collection.GetValues("table");
Here we assign the Request.QueryString to a variable of type NameValueCollection. A NameValueCollection represents a sorted collection of associated String keys and String values, which is exactly what our Request.QueryString is.
Note: In order to use the NameValueCollection, add the following reference at the top of your page:
using System.Collections.Specialized;
We can then retrieve all our tables from the NameValueCollection, by calling the GetValues() method, passing in the key value, in our case "table".
Back to our code. Let's look at the PopulateTextBoxes() method first:
private void PopulateTextBoxes()
{
    Label lExport = new Label();
    lExport.Font.Bold = true;
    lExport.Font.Name = "Verdana";
    lExport.Font.Size = FontUnit.Point(12);
    lExport.Text = "Export Scripts";
    PlaceHolder1.Controls.Add(lExport);

    PlaceHolder1.Controls.Add(new LiteralControl("<br>"));

    TextBox tExport = new TextBox();
    tExport.Font.Bold = true;
    tExport.Font.Name = "Verdana";
    tExport.Font.Size = FontUnit.Point(10);
    tExport.TextMode = TextBoxMode.MultiLine;
    tExport.Columns = 100;
    tExport.Rows = 20;
    tExport.Text = GenerateExportScripts();
    PlaceHolder1.Controls.Add(tExport);

    PlaceHolder1.Controls.Add(new LiteralControl("<br>"));

    Label lImport = new Label();
    lImport.Font.Bold = true;
    lImport.Font.Name = "Verdana";
    lImport.Font.Size = FontUnit.Point(12);
    lImport.Text = "Import Scripts";
    PlaceHolder1.Controls.Add(lImport);

    PlaceHolder1.Controls.Add(new LiteralControl("<br>"));

    TextBox tImport = new TextBox();
    tImport.Font.Bold = true;
    tImport.Font.Name = "Verdana";
    tImport.Font.Size = FontUnit.Point(10);
    tImport.TextMode = TextBoxMode.MultiLine;
    tImport.Columns = 100;
    tImport.Rows = 20;
    tImport.Text = GenerateImportScripts();
    PlaceHolder1.Controls.Add(tImport);
}
The code is easy to follow. We create the appropriate controls and call the two methods to generate our scripts and assign the return values to the TextBoxes ' Text property.
Lastly, we look at the WriteToFiles() method:
private void WriteToFiles()
{
    string exportFilePath = Server.MapPath(".") + @"\BCPScripts\" +
sourceServer + "." + sourceDatabase + ".Export.bat";
We build the path of the export scripts file by retrieving the physical path to our web page and appending the BCPScripts directory to this value. For the filename we take the source server's name and source database's name and append .Export.bat on to it. Using an @ in front of a String means that escape sequences are not processed, otherwise we would have had to have written "\\BCPScripts\\".
    if (File.Exists(exportFilePath))
        File.Delete(exportFilePath);

    StreamWriter sr = File.CreateText(exportFilePath);
    sr.Write(GenerateExportScripts());
    sr.Close();
The lines of code above do the following:
    HyperLink hExport = new HyperLink();
    hExport.Font.Bold = true;
    hExport.Font.Name = "Verdana";
    hExport.Font.Size = FontUnit.Point(10);
    hExport.Text = "Click here to download the BCP Export batch file";
    hExport.NavigateUrl = @"BCPScripts\" + sourceServer + "." + sourceDatabase
+ ".Export.bat";
    PlaceHolder1.Controls.Add(hExport);

    PlaceHolder1.Controls.Add(new LiteralControl("<br>"));
Now we add a HyperLink control to the page that points to our newly-created script file. The same process is followed for the import scripts file:
    string importFilePath = Server.MapPath(".") +
@"\BCPScripts\" + targetServer + "." + targetDatabase + ".Import.bat";

    if (File.Exists(importFilePath))
        File.Delete(importFilePath);

    sr = File.CreateText(importFilePath);
    sr.Write(GenerateImportScripts());
    sr.Close();

    HyperLink hImport = new HyperLink();
    hImport.Font.Bold = true;
    hImport.Font.Name = "Verdana";
    hImport.Font.Size = FontUnit.Point(10);
    hImport.Text = "Click here to download the BCP Import batch file";
    hImport.NavigateUrl = @"BCPScripts\" + targetServer + "." + targetDatabase + ".Import.bat";
    PlaceHolder1.Controls.Add(hImport);

    PlaceHolder1.Controls.Add(new LiteralControl("<br>"));
}
The application itself, and the source code are provided as support material for the article. Simply run the install file and follow the instructions to get the application up and running.
I hope you enjoyed the article. As mentioned at the start of the article, the application itself is not very complicated but comes in quite handy. A variety of topics were explored, which might make the code seem confusing to some, but the intention was to explore various techniques that could be of use to someone new to .NET. Happy coding!
Please rate this article using the form below. By telling us what you like and dislike about it we can tailor our content to meet your needs.
| Article Information | |
|---|---|
| Author | Mark Hughes |
| Chief Technical Editor | John R. Chapman |
| Project Manager | Helen Cuthill |
| Reviewers | Dave Schultz, John Boyd Nolan |
If you have any questions or comments about this article, please contact the technical editor.
| Fast Track Books from Wrox Press | |
|---|---|
 |
Fast
Track ASP.NET is a concise introduction to the concepts and techniques
that you will need to grasp in order to start building ASP.NET
applications. ASP.NET introduces many new features for web application
development. It promises a wealth of benefits including higher
performance, pain free multi-device development, and easier code reuse.
This book will show you what is possible and give you an understanding of
ASP.NET that you will find invaluable as you go on to develop cutting edge
applications. If you want to know what ASP.NET can do and how it should be used in order to help you gain the benefits, Fast Track ASP.NET is the book for you. |
 |
Now that the .NET Framework and the Visual
Studio .NET IDE have been officially released by Microsoft, it is
imperative for developers to get up to speed with the new .NET languages
quickly and effectively. Fast Track VB.NET is the book for this task, helping experienced Visual Basic developers note the key similarities, and differences, between their current language and Visual Basic .NET.
|
 |
If you want a C# book that is compact,
fast-paced but still provides the quality of information that you have
come to expect from a Wrox book - you want Fast
Track C#, newly available from Wrox Press. This book will help you to quickly learn about the following:
|
|
| |||||||
| |||||||||||||||
|
| ASPToday is brought to you by
Wrox Press (http://www.asptoday.com/OffSiteRedirect.asp?Advertiser=www.wrox.com/&WROXEMPTOKEN=999342ZdtQRdcR0OdEXWhOn53H).
Please see our terms
and conditions and privacy
policy. ASPToday is optimised for Microsoft Internet Explorer 5 browsers. Please report any website problems to webmaster@asptoday.com. Copyright © 2002 Wrox Press. All Rights Reserved. |